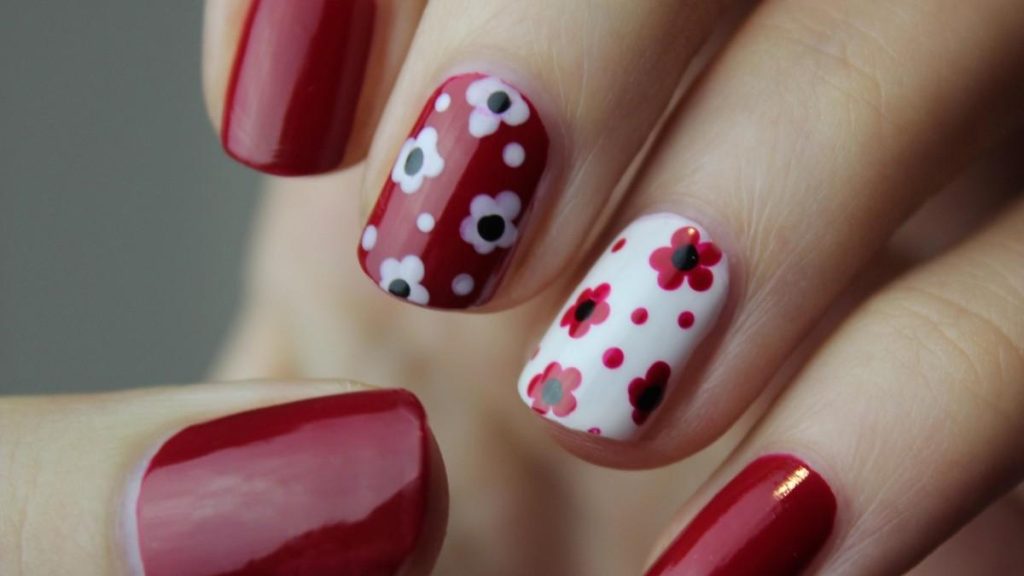
Flower nails design have become one of the most timeless and creative nail art trends a perfect mixture of beauty, elegance, and self-expression. Whether it’s delicate daisies, romantic roses, or bold tropical blooms, floral designs can instantly elevate your manicure and reflect your personal style. What makes them truly special is their versatility they can be soft and subtle for a natural look or vibrant and eye-catching for special occasions.
Achieving the perfect Flower nails design, however, is more than just painting flowers on your fingertips. It’s about mastering techniques, choosing the right tools, and understanding how colors and patterns work together to create a flawless finish. From selecting base coats and brushes to adding fine details and protective layers, every step plays a key role in making your floral designs last longer and look professional.
In this guide, we’ll explore practical tips, step-by-step methods, and expert techniques that will help you achieve salon-quality floral nails at home. Whether you’re a beginner experimenting with your first nail art or a nail enthusiast looking to refine your skills, you’ll discover everything you need to know to turn your nails into miniature works of art inspired by nature’s most beautiful blooms
From Garden to Manicure: Creating Your Floral Masterpiece
Ever scrolled through Instagram and found yourself mesmerized by those tiny, delicate flowers painted across perfectly shaped nails? You pause, zoom in, and wonder how do they make something so intricate look so effortless? Floral nails have that timeless charm they’re elegant yet playful, simple yet sophisticated. Whether you’re heading to a summer brunch, a wedding, or just want a pop of color that matches your personality, floral nail art fits every mood and occasion.
Flower nails design in nail art have been around for decades, constantly evolving with new trends, colors, and techniques. From soft pastel daisies to bold tropical blooms, there’s a floral style for everyone. The beauty of this trend lies in its versatility you can go minimal with a single flower accent or go all out with a full garden on your fingertips.
In this ultimate guide, we’ll dive deep into everything you need to know about achieving perfect floral nails from popular styles and essential tools to expert techniques and DIY tips. Whether you’re a nail art beginner or a seasoned enthusiast, by the end of this post, you’ll have all the inspiration and know-how to create your very own floral masterpiece right at home.
What Are Flower nails design ? A Bouquet of Options
When we talk about nail flowers, we’re not referring to just one style or method it’s an entire category of creative expression. Floral nail art can range from delicate hand-painted petals to textured 3D blossoms that practically bloom off your fingertips. The beauty lies in the variety you can choose a style that matches your mood, outfit, or even the season.
Here we explore the main types of Flower nails design lover should know:
- 3D Nail Art Flowers:
These are the showstoppers small, sculpted flowers made from acrylic, gel, or even pre-made plastic embellishments. They give your nails a lifelike, textured appearance that feels like tiny art sculptures. Perfect for weddings, parties, or special events, 3D flowers add instant drama and elegance. - Hand-Painted Flowers:
This is the classic and most artistic approach. Using fine brushes, artists paint floral patterns directly onto the nail. Each design is unique from dainty daisies to bold roses and showcases true craftsmanship. It’s ideal for those who love originality and want a more personal touch. - Sticker or Decal Flowers:
If you’re short on time or new to nail art, flower stickers or decals are your best friend. Simply press them onto your nails, seal with a top coat, and you’ve got a salon-worthy look in minutes. They’re affordable, easy to apply, and come in endless patterns and colors. - Stamping:
Stamping is all about precision. It involves transferring designs from a metal plate using a stamper. The result? Perfectly symmetrical floral patterns that look professional even if you’re doing them at home. It’s a favorite among nail artists for creating quick yet stunning designs.
Each of these techniques offers its own kind of magic. Whether you love intricate hand-painted art or quick and easy stickers, floral nails give you endless ways to express your creativity and style one petal at a time.
Inspiration Gallery: Flower nails design Ideas for Every Style
Floral nail art is a playground for creativity there’s something for everyone, whether you love clean minimalism or full-on botanical glam. Below are five stunning styles to inspire your next manicure, each offering a unique way to wear flowers on your fingertips.
Minimalist Daisy Accent
Style vibe: Effortless, clean, and chic.
If you adore subtle beauty, this one’s for you. A single daisy usually white petals with a yellow center placed on a nude or sheer base gives a touch of freshness without being over-the-top. It’s perfect for everyday wear or for those who want a hint of playfulness in a professional setting.
>Image suggestion: A close-up of one nude nail featuring a tiny white daisy accent near the cuticle, surrounded by natural-looking glossy nails.
Vintage Romance
Style vibe: Soft, dreamy, and timeless.
Think milky pink or pastel bases with delicately hand-painted roses or peonies. Add a hint of gold detailing or a lace pattern for a touch of vintage charm. This look feels like something out of an old love letter graceful and nostalgic.
Image suggestion: Pastel pink nails with miniature rose clusters and gold foil detailing for a romantic, antique-inspired aesthetic.
Tropical Vibes
Style vibe: Bold, bright, and vacation-ready.
Bring island energy to your nails with vivid orchids, hibiscus, or palm leaves. Use coral, turquoise, or lime green backgrounds to make the flowers pop. This design is ideal for summer, beach trips, or simply when you want your nails to feel alive with color.
Image suggestion: Vibrant tropical nail art featuring large pink hibiscus flowers and green palm accents on a turquoise base.
Abstract Florals
Style vibe: Modern, artsy, and unexpected.
Not all flowers need to look realistic abstract designs can be even more striking. Think swirls, splashes, and brush strokes that suggest petals and blooms rather than depict them directly. It’s like wearing a miniature painting on each nail.
Image suggestion: A pastel watercolor base with soft, blurred floral tones of purple, blue, and peach for an impressionist look.
Full-Bloom Garden
Style vibe: Playful, expressive, and maximalist.
Why settle for one flower when you can have a whole bouquet? Paint or design a different flower on each nail daisies, tulips, lavender, and sunflowers creating a story across your fingertips. Perfect for those who love color and variety.
Image suggestion: A hand featuring five nails, each with a distinct flower type in complementary tones, like a rainbow of floral beauty.
DIY Tutorial: How to Create Simple Hand-Painted Nail Flowers
Creating your own Flower nails design art at home is not as intimidating as it looks in fact, it’s one of the most satisfying ways to personalize your manicure. With a few tools, a steady hand, and a little patience, you can achieve salon-quality results right at your desk or dressing table. Here’s a beginner-friendly, step-by-step guide to help you paint beautiful, delicate flowers on your nails.
What You’ll Need:
Before you begin, gather your materials having everything ready will make the process smoother and more enjoyable.
- Base coat (for nail protection)
- Top coat (for shine and longevity)
- Nail polish in at least three colors (a base shade, a petal color, and a center color)
- Dotting tool or thin nail art brush (you can also use a bobby pin in a pinch!)
- Nail polish remover and cotton swabs (for cleaning up small mistakes)
Step 1: The Perfect Base
Start by applying a base coat to protect your natural nails and help your polish last longer. Once dry, paint your nails with your base color light shades like nude, pale pink, or sky blue work great for floral designs because they make the flowers stand out.
Allow it to dry completely before moving to the next step this prevents smudging and gives you a smooth surface to work on.
Step 2 The Simple Five-Petal Flower
This is the classic, beginner-friendly floral pattern that never fails to impress.
- Dip your dotting tool (or brush tip) into your chosen petal color.
- Gently make five small dots in a circular formation they don’t have to be perfect; a bit of asymmetry makes it look natural.
- Once the petals are dry, dip your tool into a contrasting color and place a tiny dot in the center this instantly transforms the dots into a flower.
Adding Leaves
To make your flowers look more complete, add a few green leaves beside them.
Using a thin brush or the pointed end of your dotting tool, create small leaf shapes or strokes next to your flowers.
Keep them simple even a few delicate strokes can make your design pop without looking too busy.
Seal the Deal
Once your floral masterpiece has dried, apply a clear top coat evenly across each nail.
This step not only adds a glossy shine but also seals and protects your artwork from chipping or fading.
Let the top coat dry completely and there you have it: your own hand-painted floral nails that look like they came straight out of a professional studio!
Pro Tips for Long-Lasting Floral Nails
You’ve spent time perfecting those tiny blossoms now it’s time to make them last. Flower nails design art looks best when it stays fresh and glossy for days (or even weeks). Whether you’re using regular polish or gel, these pro tips will help you protect your design and keep it looking flawless.
Always Cap the Free Edge
This is one of the most overlooked yet most effective tricks in nail care.
When applying your top coat, make sure to “cap” the free edge that’s the very tip of your nail.
Simply swipe the brush horizontally across the edge after coating the surface.
This seals your polish, reduces chipping, and keeps your floral details intact longer especially important if you use your hands frequently.
Protect 3D Designs with a Gel or Thick Top Coat
If you’ve gone for 3D floral elements (like acrylic petals or raised gel flowers), they need extra care.
Apply a thick layer of clear top coat or, better yet, a gel top coat to encapsulate the designs. This not only protects your flowers from breaking off but also smooths out any uneven textures, giving your nails a professional, salon-like finish.
Use a High-Quality Base Coat
Before your color even goes on, the base coat plays a crucial role in ensuring longevity.
It prevents staining (especially from dark or pigmented shades like red or navy), helps polish adhere better, and gives your manicure a smooth foundation.
A good base coat acts like primer for your nails don’t skip it if you want your floral art to last beyond a few days.
Keep Cuticles Moisturized
Healthy cuticles make your entire manicure look cleaner and more refined.
Apply cuticle oil or hand cream daily to prevent dryness, cracking, and peeling which can make even the prettiest nail art look dull.
Soft, hydrated cuticles frame your floral designs beautifully and extend the life of your manicure by preventing early lifting or flaking.
Conclusion: Let Your Creativity Bloom
Flower nails design art is more than just a beauty trend it’s a form of self-expression that allows your creativity to bloom with every brush stroke. From minimalist daisies to bold tropical blooms, there’s truly a floral style for everyone. Whether you prefer delicate hand-painted petals, easy stickers, or stunning 3D embellishments, each design tells a little story one of grace, personality, and imagination.
And the best part? You don’t need to be a professional to get stunning results. With a steady hand and the right tools, even beginners can create gorgeous floral designs. Every attempt adds a new layer of skill and confidence and before you know it, you’ll be mixing colors, trying new patterns, and creating your own nail art masterpieces.
So, let your fingertips bloom with beauty and creativity!
Frequently Asked Questions (FAQs)
- How long do floral nail designs usually last?
With a good base coat, top coat, and proper sealing, hand-painted or sticker floral nails can last up to strong 10–14 days without chipping. Gel designs may last even longer around 3 weeks. - Can beginners really create floral nail art at home?
Absolutely! Start with simple five-petal flowers using a dotting tool or bobby pin. Once you get comfortable, experiment with more detailed hand-painted or 3D designs. - What kind of nail polish is best for floral designs?
Use high-pigment nail polishes or gel paints for better definition. Quick-dry formulas are ideal for layering without smudging. - How can I make my floral nail art last longer?
Always cap the free edge of your nails with a top coat and reapply every few days. Avoid harsh detergents and keep your nails moisturized to prevent cracking. - Can I mix different types of floral designs?
Definitely! Combining hand-painted flowers with stickers or stamping can create a layered, artistic effect. Just make sure to balance colors and patterns. - Are 3D floral nails safe for daily wear?
They look stunning but can be a bit fragile. If you type a lot or do daily chores, try flat embossed gel flowers instead they give the same beauty with more durability. - What’s the easiest floral nail art style for beginners?
Start with Minimalist Daisy Accents a nude base and one tiny flower per nail. It’s quick, elegant, and perfect for practicing control.